文章目录
最近登陆服务器一直提示如下:
There were 1316 failed login attempts since the last successful login.
于是想安装一下fail2ban,记录一下。
使用
lastb显示登陆失败的用户信息, -n 可以只显示后 n 条1
w #首先查看当前服务器登录的用户1
lastb -n 10 #查看登入系统失败的用户名单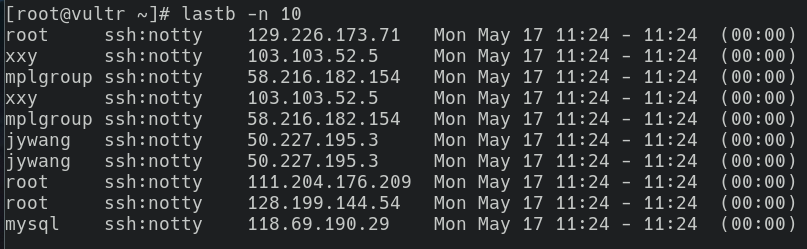
反查基本都是山东那边的ip, 一个ip 会测试两次,然后就换一个ip ,但是同一个ip 尝试3次都在10分钟以内。
安装fail2ban
1
2
yum update && yum install epel-release
sudo yum install fail2ban配置
1
cp /etc/fail2ban/jail.conf /etc/fail2ban/jail.local1
vim /etc/fail2ban/jail.local1
2
3
4
5
6
7
8
9
10
11
12
13
14
15
16
17
18[DEFAULT]
# "ignoreip" can be an IP address, a CIDR mask or a DNS host. Fail2ban will not
# ban a host which matches an address in this list. Several addresses can be
# defined using space separator.
ignoreip = 127.0.0.1/8 123.45.67.89
# "bantime" is the number of seconds that a host is banned.
bantime = 31536000 ; 1 year
# A host is banned if it has generated "maxretry" during the last "findtime"
# seconds.
findtime = 600
maxretry = 3
#ignoreip:本部分允许我们列出 IP 地址列表,Fail2Ban 不会禁止与列表中的地址匹配的主机
#bantime:主机被禁止的秒数
#findtime:如果在最近 findtime 秒期间已经发生了 maxretry 次重试,则主机会被禁止
#maxretry:是主机被禁止之前的失败次数配置 fail2ban 应用过滤器,Fail2Ban 带有一组预定义的过滤器,用于各种服务,如 ssh、apache、nginx、squid、named、mysql、nagios 等。 我们不希望对配置文件进行任何更改,只需在服务区域中添加
enabled = true这一行就可以启用任何服务。 禁用服务时将true改为false即可。1
2
3
4
5
6# SSH servers
[sshd]
enabled = true #添加这一行启用这个过滤器
port = ssh #如果注释掉会封禁所有端口
logpath = %(sshd_log)s
backend = %(sshd_backend)senabled: 确定服务是打开还是关闭。port:指明特定的服务。 如果使用默认端口,则服务名称可以放在这里。 如果使用非传统端口,则应该是端口号。logpath:提供服务日志的位置backend:指定用于获取文件修改的后端。
重启验证 fail2ban
1
# systemctl restart fail2ban.service查看验证fail2ban iptables 规则
1
iptables -L | grep f2b返回如下
1
2
3
4[root@vultr fail2ban]# iptables -L | grep f2b
f2b-sshd tcp -- anywhere anywhere multiport dports ssh
Chain f2b-sshd (1 references)
[root@vultr fail2ban]#1
sudo fail2ban-client ping # 验证fail2ban成功运行,你可以看到“pong(嘭)”作为响应查看 fail2ban 状态
查看 fail2ban jail 列表
fail2ban-client status1
2
3Status
|- Number of jail: 2
`- Jail list: apache-auth, sshd查看具体 sshd jail 情况
1
2
3
4
5
6
7
8
9
10
11[root@vultr fail2ban]# fail2ban-client status sshd
Status for the jail: sshd
|- Filter
| |- Currently failed: 8
| |- Total failed: 14753
| `- Journal matches: _SYSTEMD_UNIT=sshd.service + _COMM=sshd
`- Actions
|- Currently banned: 17
|- Total banned: 124
`- Banned IP list: 1.116.79.69 211.32.50.110 132.232.1.155 58.216.182.154 81.68.103.135 5.102.238.80 103.103.52.5 118.69.190.29 106.75.14.52 128.199.144.54 111.204.176.209 111.230.176.200 81.69.59.156 129.226.173.71 50.227.195.3 47.101.48.174 119.45.214.43
[root@vultr fail2ban]#要从 Fail2Ban 中删除禁止的 IP 地址,请运行以下命令
1
2
fail2ban-client set sshd unbanip 192.168.1.115
fail2ban-client set nginxcc unbanip IP地址 #注意要对应相应的jail其他说明
- fail2ban不是实时的,必须等日志写入文件才能监控,因此封禁滞后是正常的;
- fail2ban的日志文件是
/var/log/fail2ban.log; - 可以用
awk '{print $1}' /var/log/nginx/access.log| sort | uniq -c | sort -n | tail查看请求最频繁的IP地址; - 可以用
netstat -nt | awk '{print $5}' | cut -d: -f1 | sort | uniq -c | sort -n | tail查看与当前服务器连接最多的IP; - 同一个监控目标中可以配置多个日志文件、action,同一个过滤规则中可以写多条正则匹配,但这些行必须对齐。